Recumbent fitting instructions
Mark around the disc on both side with a pencil using the EZ Disc
Add electric tape provided overlapping the line by 2-3mm, place EZDisc down as centrally as possible avoiding spokes and with the valve showing "the valve does not have to be totally central in the hole, at the same time line up as many holes as possible with the spokes. Once this is done secure with tape to hold in place.


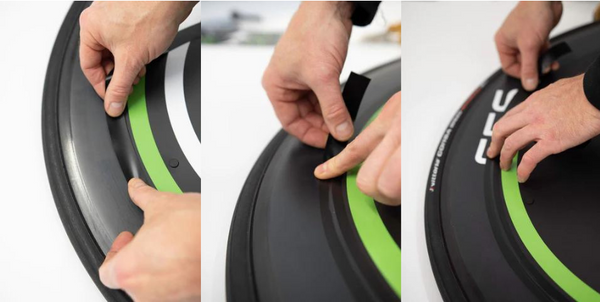
Now your EZDisc is central and secure with tape, thread the cable tie through one of the holes located by a spoke, then thread it back through the hole located next to it (this should come back past the other side of the spoke) and fasten it around an individual spoke if possible and use at least 5 cable ties or as many as possible, work your way around the EZDisc but do not pull fully tight.
"please look at below pictures"
Re check the position of the EZDisc and pull cable ties tight from opposite sides, please pull as tight as possible to secure EZDisc, once this is done snip excess cable ties leaving around 5mm.

Now offer non-drive side up and add EZDisc retainer bolts, these should nip up to the disc but not indenting the disc, use a screw driver to lightly screw tight, removed tape your EZDisc should now be solid on the wheel.


You do not need the rim tape in most cases but can add a nice finish, in some cases it helps hold the rim flat to the wheel. The rim tape is made from very high tack black vinyl cut in to shaped segments for EZ application.
Again the dots are not a vital part to the application, these can be added by placing the screw in the middle of the dot and applying heat using a hairdryer and working your finger around the bolt.


Replace your cassette and disc brake "if you have one" and get ready to join 4,000 other EZ Riders all over the world and save minutes of your bike leg.


Important note,
Remove the rear parking brake and use Velcro straps, this also will help reduce the weight of the bike and help with racing. (Velcro strap provided) you can also get https://hostelshoppe.com/collections/brakes-pads?filter.p.product_type=Parking+Brakes&filter.p.product_type=Brake+Levers&filter.p.vendor=Aardvark&filter.p.vendor=TerraTrike
your might find in some cases the EZDisc slightly pops away from the the rim, this can be rectified by using different size binding screws supplied, if not supplied we will be happy to send these out. Also the rim tape can help secure this in place. "smaller screws around valve"

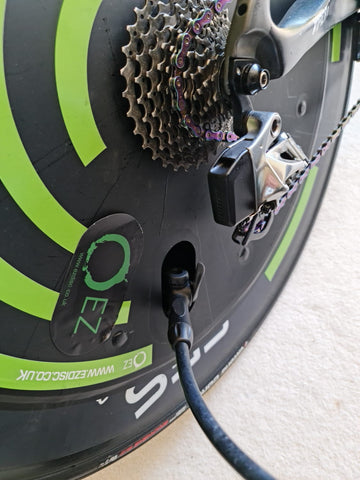
"Please see below an example of how to inflate your wheel".
In nearly every case so far you do not need to remove your disc or any screws to inflate your tyre, or even use a valve extender, this is the same case with a CO2 canisters you just need to be a bit forceful, don't worry the EZDisc is extremely robust. If you find this is impossible then please feel free to contact us for advice, you also may need to consider a different valve length.